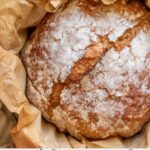
Description
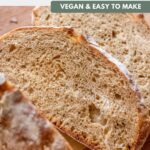
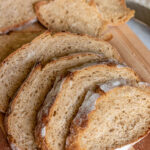
This No Knead Whole Wheat Bread is healthy, soft, flavorful and bakes to perfection in a Dutch oven. Made using a quick rise method and perfect for beginners.
Ingredients
- 2 cups One Degree Organics Sprouted Whole Wheat Flour (290g)
- 2 cups all-purpose flour (290g)
- 2 cups warm water, between 100-115°F
- 1 packet active dry yeast (7g)
- 1 1/2 tsp kosher salt (6g)
- 2 tbsp maple syrup or cane sugar
- 1 tbsp vital wheat gluten (10g)
Instructions
- In a large mixing bowl, combine your dry ingredients including your flour, vital wheat gluten, dry yeast and salt. Carefully mix everything together until evenly distributed.
- To a separate large measuring cup, measure out your warm water and stir in the maple syrup to combine.
- Pour the wet ingredients into the dry and with a spatula starting at the edge of the bowl, fold the ingredients together until most of the flour is incorporated. You should be left with a rough looking dough.
- Cover your dough with a silicone cover or plastic wrap and turn the light of your oven on. Place the bowl in the oven (make sure the oven itself is not turned on) and allow to rise for 1 hour.
- Remove the bowl from the oven, then place your whole Dutch oven in the oven and preheat the oven to 450°F. Allow the Dutch oven to heat up for at least 25 minutes as you prep the dough.
- As the oven preheats, transfer the dough to a well-floured smooth working surface. Lightly sprinkle a little flour on top and then fold your dough in on itself. Start by folding each edge towards the center of the dough to form a tighter shape. Flip the dough over, and with your hands shape into a round loaf. Once formed, place the dough on a piece of lightly floured parchment paper, then wrap again with plastic wrap or cover with a large bowl and allow the dough to rest as the Dutch oven comes to temperature.
- Using oven mitts, very carefully remove the Dutch oven from the oven. Remove the wrap from the dough and carefully lift the parchment paper with the dough and place into the Dutch oven. Place the Dutch oven lid back on and then place the whole thing into the oven to bake for 30 minutes with the lid on.
- After 30 minutes, remove the lid and bake the bread for another 10 to 15 minutes until the bread is golden and crusty.
- Carefully, remove the bread from the Dutch oven and transfer the bread to a cooling rack for at least 30 minutes before slicing into it.
Notes
Check to make sure your yeast is not expired. Old or expired yeast will prevent your bread from properly rising.
Use warm water, not hot water for your yeast. It should be between 100-115°F.
If you need a warm place for your dough to rise, place it in the oven with just the oven light on.
Do not cover your bowl with a kitchen towel as it can get stick from the dough.
You can test to see if your bread is done by checking the internal temperature of the bread, which should read between 190 to 200°F. Another sign it is done is to tap the bottom of the bread. If you get a hollow sound, it’s a good sign it is done baking.